AWS Big Data Blog
Integrate ThoughtSpot with HAQM Redshift using AWS IAM Identity Center
HAQM Redshift is a fast, scalable, and fully managed cloud data warehouse that allows you to process and run your complex SQL analytics workloads on structured and semi-structured data. Tens of thousands of customers use HAQM Redshift to process large amounts of data, modernize their data analytics workloads, and provide insights for their business users.
The combination of HAQM Redshift and ThoughtSpot’s AI-powered analytics service enables organizations to transform their raw data into actionable insights with unprecedented speed and efficiency. Through this collaboration, HAQM Redshift now supports AWS IAM Identity Center integration with ThoughtSpot, enabling seamless and secure data access with streamlined authentication and authorization workflows. This single sign-on (SSO) integration is available across ThoughtSpot’s cloud landscape and can be used for both embedded and standalone analytics implementations.
Prior to the IAM Identity Center integration, ThoughtSpot users didn’t have native connectivity to integrate HAQM Redshift with their identity providers (IdPs), which can provide unified governance and identity propagation across multiple AWS services like AWS Lake Formation and HAQM Simple Storage Service (HAQM S3).
Now, ThoughtSpot users can natively connect to HAQM Redshift using the IAM Identity Center integration, which streamlines data analytics access management while maintaining robust security. By configuring HAQM Redshift as an AWS managed application, organizations benefit from SSO capabilities with trusted identity propagation and a trusted token issuer (TTI). The IAM Identity Center integration with HAQM Redshift provides centralized user management, automatically synchronizing access permissions with organizational changes—whether employees join, transition roles, or leave the organization. The solution uses HAQM Redshift role-based access control features that align with IdP groups synced in IAM Identity Center. Organizations can further enhance their security posture by using Lake Formation to define granular access control permissions on catalog resources for IdP identities. From a compliance and security standpoint, the integration offers comprehensive audit trails by logging end-user identities both in HAQM Redshift and AWS CloudTrail, providing visibility into data access patterns and user activities.
Dime Dimovski, a Data Warehousing Architect at Merck, shares:
“The recent integration of HAQM Redshift with our identity access management center will significantly enhance our data access management because we can propagate user identities across various tools. By using OAuth authentication from ThoughtSpot to HAQM Redshift, we will benefit from a seamless single sign-on experience—giving us granular access controls as well as the security and efficiency we need.”
In this post, we walk you through the process of setting up ThoughtSpot integration with HAQM Redshift using IAM Identity Center authentication. The solution provides a secure, streamlined analytics environment that empowers your team to focus on what matters most: discovering and sharing valuable business insights.
Solution overview
The following diagram illustrates the architecture of the ThoughtSpot SSO integration with HAQM Redshift, IAM Identity Center, and your IdP.

The solution includes the following steps:
- The user configures ThoughtSpot to access HAQM Redshift using IAM Identity Center.
- When a user attempts to sign in, ThoughtSpot initiates a browser-based OAuth flow and redirects the user to their preferred IdP (such as Okta or Microsoft EntraID) sign-in page to enter their credentials.
- Following successful authentication, IdP issues authentication tokens (ID and access token) to ThoughtSpot.
- The HAQM Redshift driver then makes a call to the HAQM Redshift enabled AWS Identity Center application and forwards the access token.
- HAQM Redshift passes the token to IAM Identity Center for validation.
- IAM Identity Center first validates the token using the OpenID Connect (OIDC) discovery connection to the TTI and returns an IAM Identity Center generated access token for the same user. The TTI enables you to use trusted identity propagation with applications that authenticate outside of AWS. In the preceding figure, the IdP authorization server is the TTI.
- HAQM Redshift uses IAM Identity Center APIs to obtain the user and group membership information from AWS Identity Center.
- The ThoughtSpot user can now connect with HAQM Redshift and access data based on the user and group membership returned from IAM Identity Center.
In this post, you will use the following steps to build the solution:
- Set up an OIDC application.
- Set up a TTI in IAM Identity Center.
- Set up client connections and TTIs in HAQM Redshift.
- Federate to HAQM Redshift from ThoughtSpot using IAM Identity Center.
Prerequisites
Before you begin implementing the solution, you must have the following in place:
- Set up IAM Identity Center and HAQM Redshift integration by following the steps in Integrate Identity Provider (IdP) with HAQM Redshift Query Editor V2 using AWS IAM Identity Center for seamless Single Sign-On
- Have a ThoughtSpot paid account with admin access. IAM Identity Center authentication only works with a ThoughtSpot paid account.
- Have an Okta account that has an active subscription. You need an admin role to set up the application on Okta. If you’re new to Okta, you can sign up for a free trial or for a developer account.
- Alternatively, have an EntraID account that has an active subscription. You need an admin role to set up the application on EntraID. If you don’t have an EntraID account, you can create an account for free.
Set up an OIDC application
In this section, we’ll show you the step-by-step process to set up an OIDC application using both Okta and EntraID as the identity providers.
Set up an Okta OIDC application
Complete the following steps to set up an Okta OIDC application:
- Sign in to your Okta organization as a user with administrative privileges.
- On the admin console, under Applications in the navigation pane, choose Applications.
- Choose Create App Integration.
- Select OIDC – OpenID Connect for Sign-in method and Web Application for Application type.
- Choose Next.

- On the General tab, provide the following information:
- For App integration name, enter a name for your app integration. For example,
ThoughtSpot_Redshift_App. - For Grant type, select Authorization Code and Refresh Token.
- For Sign-in redirect URIs, choose Add URI and along with the default URI, add the URI
http://<your_okta_instance_name>/callosum/v1/connection/generateTokens. The sign-in redirect URI is where Okta sends the authentication response and ID token for the sign-in request. The URIs must be absolute URIs. - For Sign-out redirect URIs, keep the default value as
http://localhost:8080. - Skip the Trusted Origins section and for Assignments, select Skip group assignment for now.
- Choose Save.
- For App integration name, enter a name for your app integration. For example,
- Choose the Assignments tab and then choose Assign to Groups. In this example, we’re assigning
awssso-financeandawssso-sales. - Choose Done.


Set up an EntraID OIDC application
To create your EntraID application, follow these steps:
- Sign in to the Microsoft Entra admin center as Cloud Application Administrator (or higher level of access).
- Browse to App registrations under Manage, and choose New registration.
- Enter a name for the application. For example,
ThoughtSpot-OIDC-App. - Select a supported account type, which determines who can use the application. For this example, select the first option in the list.
- Under Redirect URI, choose Web for the type of application you want to create. Enter the URI where the access token is sent to. Your redirect URL will be in the format
http://<your_instance_name>/callosum/v1/connection/generateTokens. - Choose Register.

- In the navigation pane, choose Certificates & secrets.
- Choose New client secret.
- Enter a description and select an expiration for the secret or specify a custom lifetime. For this example, keep the Microsoft recommended default expiration value of 6 months.
- Choose Add.
- Copy the secret value.
The secret value will only be presented one time; after that you can’t read it. Make sure to copy it now. If you fail to save it, you must generate a new client secret.
- In the navigation pane, under Manage, choose Expose an API.
If you’re setting up for the first time, you can see Add to the right of the application ID URI.
- Choose Save.
- After the application ID URI is set up, choose Add a scope.
- For Scope name, enter a name. For example,
redshift_login. - For Admin consent display name, enter a display name. For example,
redshift_login. - For Admin consent description, enter a description of the scope.
- Choose Add scope.

- In the navigation pane, choose API permissions.
- Choose Add a permission and choose Microsoft Graph.
- Choose Delegated Permission.
- Under OpenId permissions, choose
email,offlines_access,openid, andprofile, and choose Add permissions.

Set up a TTI in IAM Identity Center
Assuming you have completed the prerequisites, you will establish your IdP as a TTI in your delegated administration account. To create a TTI, refer to How to add a trusted token issuer to the IAM Identity Center console. In this post, we walk through the steps to set up a TTI for both Okta and EntraID.
Set up a TTI for Okta
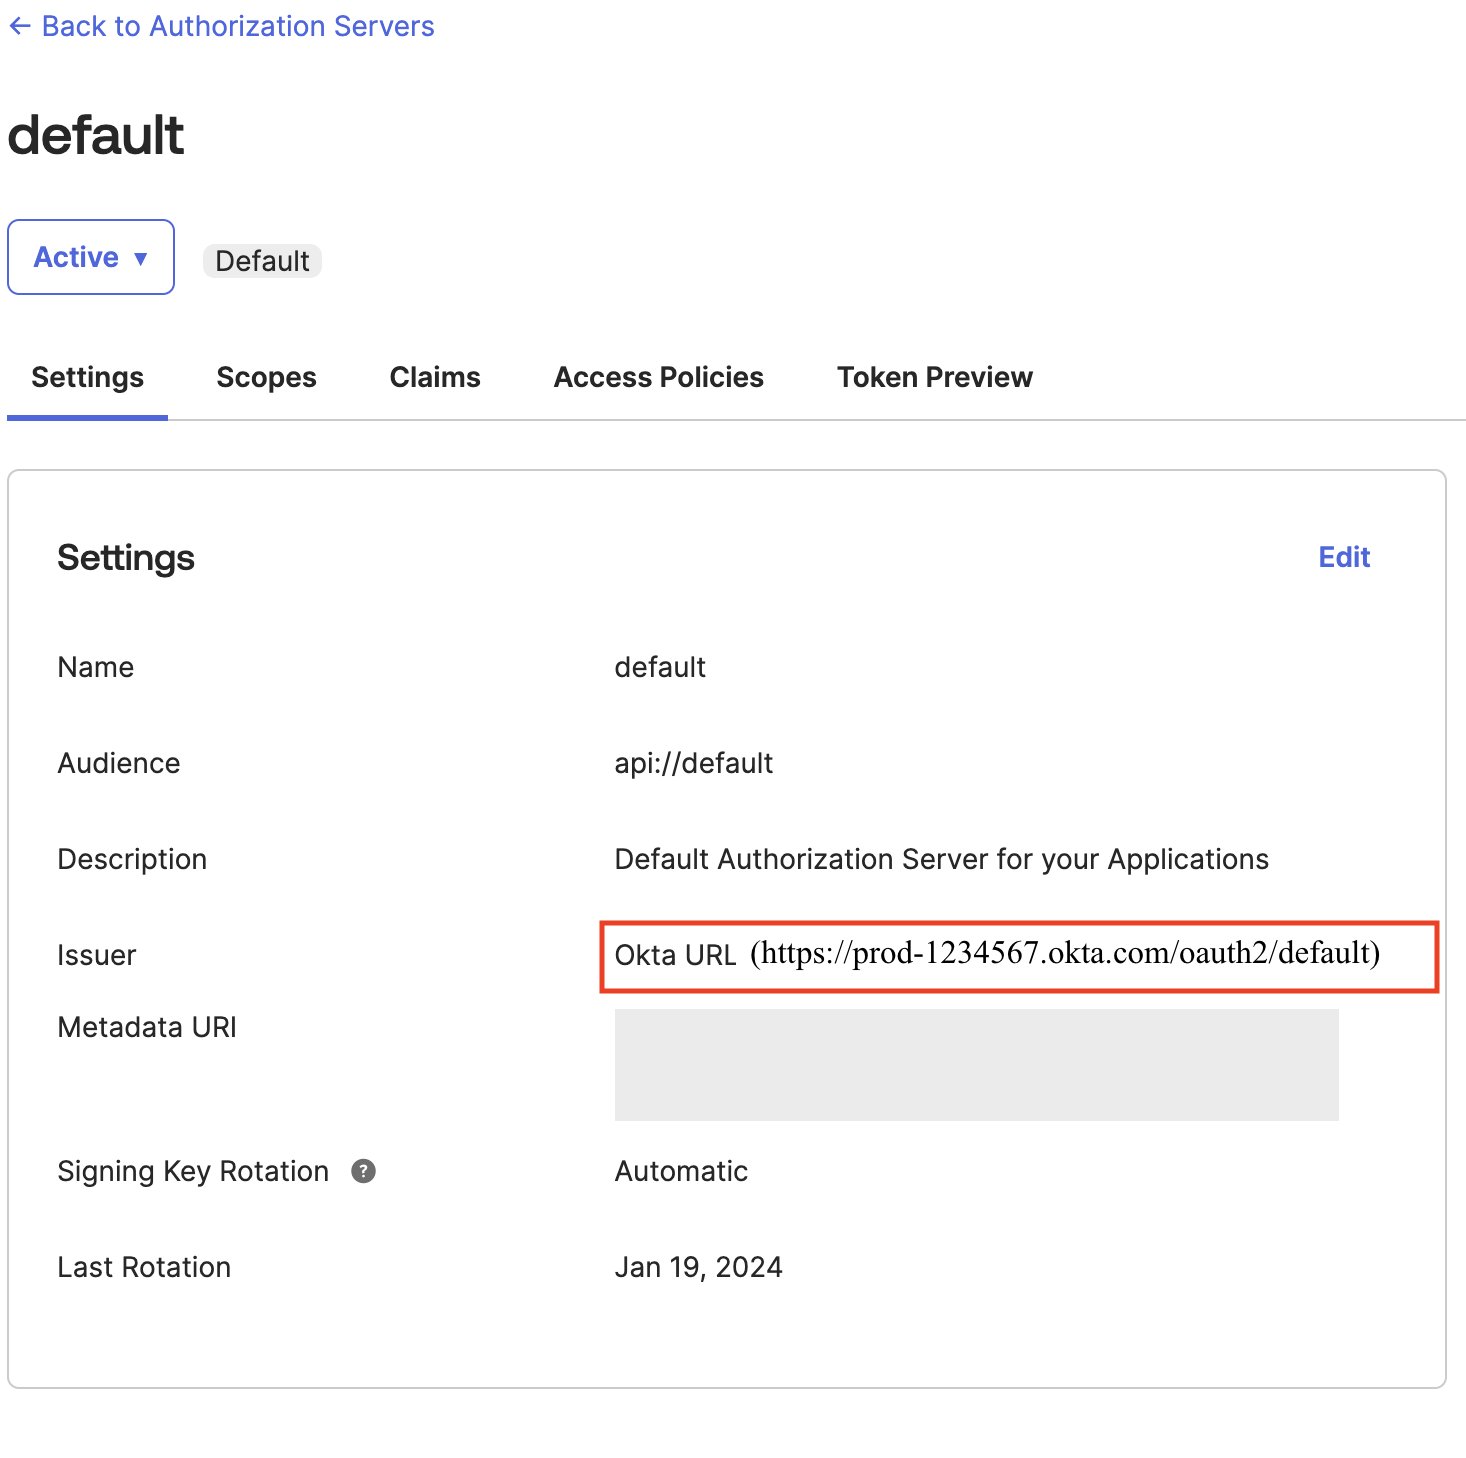
To get the issuer URL from Okta, complete the following steps:
- Sign in as an admin to Okta and navigate to Security and then to API.
- Choose Default on the Authorization Servers tab and copy the Issuer
url.
- In the Map attributes section, choose which IdP attributes correspond to Identity Center attributes. For example, in the following screenshot, we mapped Okta’s
Subjectattribute to theEmailattribute in IAM Identity Center. - Choose Create trusted token issuer.

Set up a TTI for EntraID
Complete the following steps to set up a TTI for EntraID:
- To find out which token your application is using, under Manage, choose Manifest.
- Locate the
accessTokenAcceptedVersionparameter:nullor1indicate v1.0 tokens, and2indicates v2.0 tokens.


Next, you need to find the tenant ID value from EntraID.
- Go to the EntraID application, choose Overview, and a new page will appear containing the Essentials
- You can find the tenant ID value as shown in the following screenshot. If you’re using the v1.0 token, the issuer URL will be
http://sts.windows.net/<Directory (tenant) ID>/. If you’re using the v2.0 token, the issuer URL will behttp://login.microsoftonline.com/<Directory (tenantid) ID>/v2.0.

- For Map attributes, the following example uses Other, where we’re specifying the user principal name (
upn) as the IdP attribute to map with Email from the IAM identity Center attribute. - Choose Create trusted token issuer.

Set up client connections and TTIs in HAQM Redshift
In this step, you configure the HAQM Redshift applications that exchange externally generated tokens to use the TTI you created in the previous step. Also, the audience claim (or aud claim) from your IdP must be specified. You need to collect the audience value from the respective IdP.
Acquire the audience value from Okta
To acquire the audience value from Okta, complete the following steps:
- Sign in as an admin to Okta and navigate to Security and then to API.
- Choose Default on the Authorization Servers tab and copy the Audience value.

Acquire the audience value from EntraID
Similarly, to get the audience value EntraID, complete the following steps:
- Go to the EntraID application, choose Overview, and a new page will appear containing the Essentials
- You can find the audience value (Application ID URI) as shown in the following screenshot.

Configure the application
After you collect the audience value from the respective IdP, you need to configure the HAQM Redshift application in the member account where the HAQM Redshift cluster or serverless instance exists.
- Choose IAM Identity Center connection in the navigation pane on the HAQM Redshift console.
- Choose the HAQM Redshift application that you created as part of the prerequisites.
- Choose the Client connections tab and choose Edit.
- Choose Yes under Configure client connections that use third-party IdPs.
- Select the check box for Trusted token issuer that you created in the previous section.
- For Aud claim, enter the audience claim value under Configure selected trusted token issuers.
- Choose Save.
Your IAM Identity Center, HAQM Redshift, and IdP configuration is complete. Next, you need to configure ThoughtSpot.
Federate to HAQM Redshift from ThoughtSpot using IAM Identity Center
Complete the following steps in ThoughtSpot to federate with HAQM Redshift using IAM Identity Center authentication:
- Sign in to ThoughtSpot cloud.
- Choose Data in the top navigation bar.
- Open the Connections tab in the navigation pane, and select the Redshift
Alternatively, you can choose Create new in the navigation pane, choose Connection, and select the Redshift tile.
- Create a name for your connection and a description (optional), then choose Continue.
- Under Authentication Type, choose AWS IDC OAuth and enter following details:
- For Host, enter the Redshift endpoint. For example,
test-cluster.ab6yejheyhgf.us-east-1.redshift.amazonaws.com. - For Port, enter 5439.
- For OAuth Client ID, enter the client ID from the IdP OIDC application.
- For OAuth Client Secret, enter the client secret from the IdP OIDC application.
- For Scope, enter the scope from the IdP application:
- For Okta, use
openid offline_access openidprofile. You can use the Okta scope values shared earlier as is on ThoughtSpot. You can modify the scope according to your requirements. - For EntraID, use the API scope and API permissions. For example,
api://1230a234-b456-7890-99c9-a12345bcc123/redshift_login offline_access.
- For Okta, use
- For API scope value, go to the OIDC application, and under Manage, choose Expose an API to acquire the value.
- For API permissions, go to the OIDC application, and under Manage, choose API permissions to acquire the permissions.
- For Auth Url, enter the authorization endpoint URI:
- For Okta use
http:// <okta-hostname>/oauth2/default/v1/authorize. For example,http://prod-1234567.okta.com/oauth2/default/v1/authorize. - For EntraID, use
http://login.microsoftonline.com/<Directory (tenantid) ID>/oauth2/v2.0/authorize. For example,http://login.microsoftonline.com/e12a1ab3-1234-12ab-12b3-1a5012221d12/oauth2/v2.0/authorize.
- For Okta use
- For Access token Url, enter the token endpoint URI:
- For Okta, use
http://<okta-hostname>/oauth2/default/v1/token. For example,http://prod-1234567.okta.com/oauth2/default/v1/token. - For EntraID, use
http://login.microsoftonline.com/<Directory (tenantid) ID>/oauth2/v2.0/token. For example,http://login.microsoftonline.com/e12a1ab3-1234-12ab-12b3-1a5012221d12/oauth2/v2.0/token.
- For Okta, use
- For AWS Identity Namespace, enter the namespace configured in your HAQM Redshift IAM Identity Center application. The default value is
AWSIDCunless previously customized. For this example, we useawsidc. - For Database, enter the database name you want to connect. For example, dev.
- For Host, enter the Redshift endpoint. For example,
- Choose Continue.
- Enter your IdP user credentials in the browser pop-up window.
The following screenshot illustrates the ThoughtSpot integration with HAQM Redshift using Okta as the IdP.

The following screenshot shows the ThoughtSpot integration with HAQM Redshift using EntraID as the IdP.

Upon a successful authentication, you will be redirected back to ThoughtSpot and logged in as an IAM Identity Center authenticated user.
Congratulations! You’ve logged in through IAM Identity Center and HAQM Redshift, and you’re ready to dive into your data analysis with ThoughtSpot.
Clean up
Complete the following steps to clean up your resources:
- Delete the IdP applications that you created to integrate with IAM Identity Center.
- Delete the IAM Identity Center configuration.
- Delete the HAQM Redshift application and the HAQM Redshift provisioned cluster or serverless instance that you created for testing.
- Delete the IAM role and IAM policy that you created for IAM Identity Center and HAQM Redshift integration.
- Delete the permission set from IAM Identity Center that you created for HAQM Redshift Query Editor V2 in the management account.
- Delete the ThoughtSpot connection to integrate with HAQM Redshift using AWS IDC OAuth.
Conclusion
In this post, we explored how to integrate ThoughtSpot with HAQM Redshift using IAM Identity Center. The process consisted of registering an OIDC application, setting up an IAM Identity Center TTI, and finally configuring ThoughtSpot for IAM Identity Center authentication. This setup creates a robust and secure analytics environment that streamlines data access for business users.
For additional guidance and detailed documentation, refer to the following key resources:
- Connect Redshift with AWS IAM Identity Center for a single sign-on experience
- Integrate Identity Provider (IdP) with HAQM Redshift Query Editor V2 and SQL Client using AWS IAM Identity Center for seamless Single Sign-On
- Simplify access management with HAQM Redshift and AWS Lake Formation for users in an External Identity Provider
- Set up cross-account AWS Glue Data Catalog access using AWS Lake Formation and AWS IAM Identity Center with HAQM Redshift and HAQM QuickSight
About the authors
 Maneesh Sharma is a Senior Database Engineer at AWS with more than a decade of experience designing and implementing large-scale data warehouse and analytics solutions. He collaborates with various HAQM Redshift Partners and customers to drive better integration.
 BP Yau is a Sr Partner Solutions Architect at AWS. His role is to help customers architect big data solutions to process data at scale. Before AWS, he helped HAQM.com Supply Chain Optimization Technologies migrate its Oracle data warehouse to HAQM Redshift and build its next generation big data analytics platform using AWS technologies.
 Ali Alladin is the Senior Director of Product Management and Partner Solutions at ThoughtSpot. In this role, Ali oversees Cloud Engineering and Operations, ensuring seamless integration and optimal performance of ThoughtSpot’s cloud-based services. Additionally, Ali spearheads the development of AI-powered solutions in augmented and embedded analytics, collaborating closely with technology partners to drive innovation and deliver cutting-edge analytics capabilities. With a robust background in product management and a keen understanding of AI technologies, Ali is dedicated to pushing the boundaries of what’s possible in the analytics space, helping organizations harness the full potential of their data.
 Debu Panda is a Senior Manager, Product Management at AWS. He is an industry leader in analytics, application platform, and database technologies, and has more than 25 years of experience in the IT world.